Text Editing in MS Word | Explanation & Introduction
Introduction
Formatting is the process if specifying how a document should appear
when printed. Formatting can be divided into three categories:
- Character formatting
- Paragraph formatting
- Document formatting
We will discuss in detail how to format characters in this post. Paragraph
and Document formatting is discussed in another post.
Character Formatting Terminology
Characters:
Characters are the letters, numerals, punctuation marks and special symbol
(such as @, *, and &) that you type from the keyboard.
Fonts and Typefaces:
The terms fonts and typefaces are not actually the same but are used
interchangeably. A font or typeface is defined as a collection of characters
and symbols with a common appearance or design. Courier is an example of a
font. Times is a different font (or typeface) used in printing newspaper and
magazines because it takes minimum space to write in Times font.
Font Families
A collection of all of the variations of a font is called a font family. For
example, the Arial font family. This family includes Arial, Arial Black and
Arial Narrow characters.
Monospaced and Proportionally Spaced Fonts
Fonts can be:
- Monospaced (fixed in width)
- Proportionally spaced (made variable in width)
Monospaced Fonts - Fonts like Courier use the same amount of
horizontal space on a line for each character. With a monospaced font a letter
i takes the same amount of horizontal space as the letter W. Monospaced
fonts are used in legal documents. This is an inefficient use of space and
causes uneven looking words.
Proportionally Spaced Fonts - Proportionally spaced fonts fit narrow
letters in less space. Arial and Times New Roman examples of proportionally
used in Word.
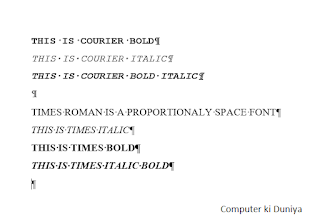
Figure 1.1 shows various type of fonts. Notice the white space on
either side of the letter I in the Courier example.

|
| Figure 1.1) Monospaced and Proportionally spaced formatting |
Font Sizes
The size of the font is measured in points, and as the point size increases,
the size of the letter also increases. One point equals 1/72th of an inch.
Point size is the measure of a font's height but not its width Many font
families are available in compressed and expanded forms as well as shown in
normal widths (See Figure 1.2).

|
| Figure 1.2) Compressed, expanded and normal typed text |
Serif and Sans Serif Fonts
Fonts can be further categorized as:
- Serif Fonts
- Sans Serif Fonts
Serif Fonts - Serif fonts have fine lines that finish off the main
strokes-for example, at the bottom of a capital T or at the ends of the T's
crossbar (See Figure 1.1).
Sans Serif - The "finishing strokes" called serifs, are absent in Sans
Serif fonts (7) (See Figure 1.1).
Types of Fonts
Each font has to fulfil following two roles:
- It must appear on-screen.
- It is printed on the printer.
The TrueType Font management system uses a single outline to fulfil both the
requirements. They offer two advantages:
- TrueType Fonts are scalable, i.e., one image of each character is required.
- These fonts are device independent. It means only one version of the font need to reside in the system but can be used for any type of printer or screen.
⇒To ensure that the fonts are displayed as they will print, do this:
- Click the Office button and select Word Options button.
- In Word Options dialog box, choose Advanced page options.
- Under Show document content click use draft font check box.
- Click OK.
Formatting Characters:
Word enables the under mentioned character formatting options:
- Font, font style and font size changes
- Underline options, and color application
- Applying font effects namely italics, bold, etc.
- Changing inter-character spacing.
Character Formatting using the Font Command
Word 2007 can use any fonts installed in a PC (Personal Computer)
system. Theoretically, you can print any font in any size from 1 point to 1637
points. This corresponds to character heights ranging from approximately 1/72
of an inch to about 22 inches. In actual work you will probably work with type
sizes ranging from about 7 to 72 points most of the time. Some of the
character for- matting options discussed later in the section vary depending
on the type of font you select.
⇒To change the font of an existing text, do this:
- Select the text you want to format.
- Click the Home tab of Font group. Click Font launcher dialog box. The Font dialog box as shown in Figure 1.3 appears.
- Click on the Font Tab of the Font dialog box.
- The Font Tab property sheet appears as shown in Figure 1.3. It offers the options for changing the font style and size.
- To change the Font, enter the name of the font in the Font: text box. Alternatively, use the scroll box on the right of the Font list to see all the fonts available.
- To change the Font Style options, type the desired option in the Font style: option box. Alternatively, select from the list box below the Font style: box.
- The Size: text box displays the current font size. To change the size enter the new size in the Size: text box. Alternatively, select the font size from the list box just below the Size: text box.
- Underline style: drop-down list offers different underlining options as explained in figure 1.4 and shown in Figure 1.4. Click the down arrow to see the various underlining options.
- Font color: drop-down left offers different colors option to the text. You would see the displays of the text in color if you have a color monitor. You can also print it in color on a color printer.
- The Effects box of the Font tab enables you to give various font effects as given in figure 1.4.

|
| Figure 1.4) Different types of underlines |
The preview box at the bottom of the Font dialog box shows the effect of
selected options (See Figure 1.5).

|
| Figure 1.5) Font effect option |
Character Spacing Option
⇒To customize the character spacing options, do this:
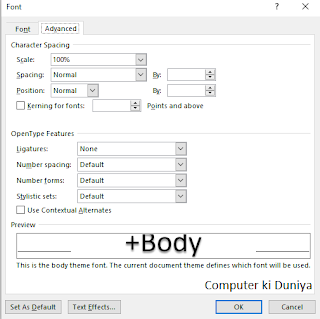
- In the Font dialog box, click the Character Spacing tab. The property sheet as shown in Figure 1.6 appears.
- Different options are discussed in Table 9.3 and displayed in Figure 1.7.
| Group | Option | Description |
| Scale | Enter the percentage text you want, ie, percent ages above 100 percent stretch the text. |
Percent ages below 100 percent compress the text. |
| Spacing | Normal Expanded Condensed |
Default spacing for the selected font. Space between characters are Expanded Space between characters are condensed. |
| By | 1 pt (default), or enter your own amount | Number of points by which text is expanded or condensed or spacing option. |
| Position | Normal Raised |
Text is printed on the base line. Text is raised above the base- line by the increment you indicate in the By box. |
| By | 3 pt (default), or enter a value | Number of points by which text is expanded or condensed or spacing option. |

|
|
Figure 1.6) Character spacing option-property sheet of font dialog box. |

|
| Figure 1.7) Different options of character spacing |
Character Formatting using the Ribbon
To modify character appearance, you can also use the commands in Ribbon or
when you select the text, a mini toolbar appears.
⇒To change the font using Ribbon, do this:
- Select the text that you want to change the font. Click the down arrow to the right of the font list box (See Figure 1.8).
- The drop-down list shows all the available fonts. Use the scroll arrow on the right of the drop-down list to scroll through the list. When you move the cursor over the font you can see the changes in the appearance of text.
- To change the size, enter the desired font size in Font size list box and press Enter. Or you can select from the mini toolbar (See Figure 1.9).
- To make a character Regular, Bold, Italic click the corresponding button on the mini toolbar (See Figure 1.9). These are toggle buttons clicking them once switches on the option and clicking them the second time switches off the option.

|
| Figure 1.8) Font drop-down list |

|
|
Figure 1.9) Font size drop-down list on the mini toolbar |
Changing the Colors of Text
When you emphasize text, you change the color of text. There are two ways to
use color.
- Change the colour of text (Using Font colour).
- Highlight the text with a different colour (Using Text High- light colour).
⇒To change the colour of text using Ribbon, do this:
- Select the text you want to colour.
- Click the Home tab of Font group.
- Click the downward-pointing arrow to the right of the Font Color icon.
- A colour palette appears as shown in Figure 1.10. When you move the mouse pointer over the Theme Colors, you can see the changes of colour appear in the text.
- Click a desired colour you want. After you choose a colour, that colour appears directly on the Font Colour icon. Now you can select text and click directly on the Font Color icon.

|
|
Figure 1.10) Coloring text in different ways can emphasize parts of your document |
Highlighting Text
Use the highlight tool to mark and find important text in your document.
⇒To highlight text using Ribbon, do this:
- Select the text you want to highlight.
- Click the Home tab of Font group.
- Click the downward-pointing arrow to the right of the Text Highlight Color icon. A Colour palette appears. Click the mouse pointer over the colour, you can see the changes appearing in the selected text. Choose the desired color you want to apply.
- Press Ese key (or click the Text Highlight Color icon again) to turn off the Text Highlight Color command.
Applying Character Formatting Using the Keyboard:
Most of the character formatting can also be applied using the
keyboard shortcut as discussed in the following sections:
⇒To format using shortcut keys, do this:
Select the text you want to format and use the shortcut key
combinations for the desired formatting effect. table
Using the Change Case Command
Word provides facilities to change to capital letters of any text by
using the Change Case command.
⇒To apply capitalization, do this:
- Select the text for which you want to change capitalization.
- Click the Home tab of Font group. Click Change Case command.
- The options offered by the Change case dialog box are as follows:
- To select an option, click the radio button next to the desired option. The option is selected when a dot appears in the radio button. To deselect the option click again.
- Click OK or press Enter.
- The above options are applied in the text and shown in Figure 1.11.

|
| Figure 1.11) Change case dialog box |


Comments
Post a Comment